


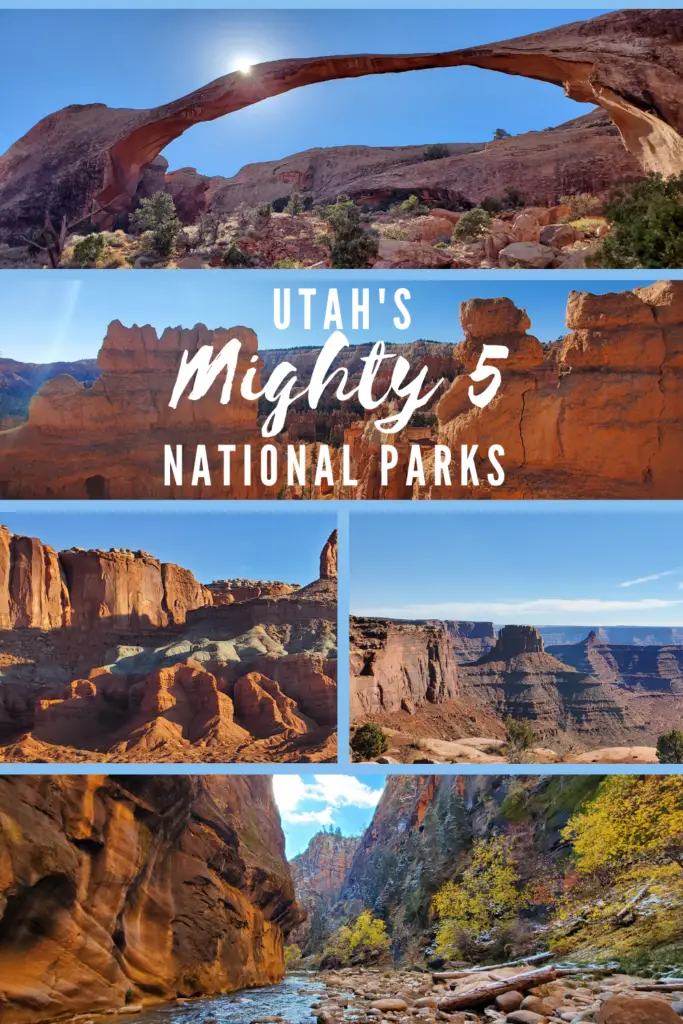
The Utah National Parks, also known as the Utah Mighty 5, are chock full of peculiar rock formations, massive balanced rocks, and surprisingly colorful rock layers.
Just a bunch of parks full of a bunch of rocks? Absolutely not.
Within the parks are some of the most dangerous and thrilling hikes, flowing rivers, thriving orchards, and unending kid-friendly experiences.
Arches National Park is all about up-close and colossal mind-bending rock formations including balanced rocks, fins, and pinnacles. And, well…lots of arches.
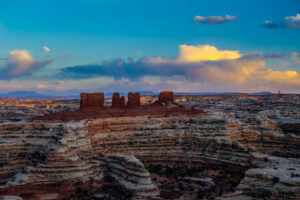
Canyonlands National Park is all about deep canyons carved by the Colorado River and tributaries, buttes, and iconic rock formations. All this beauty amidst primitive desert wilderness.
Capitol Reef National Park is all about a geographic wrinkle in the earth known as the Waterpocket Fold. Colorful rock layers amidst a preserved historic pioneer community and orchards make for unique driving and hiking experiences here.
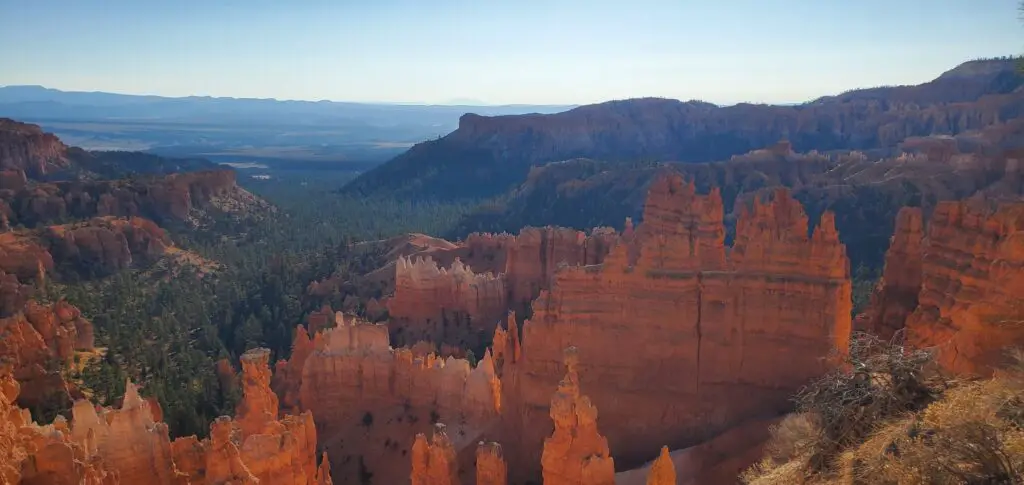
Bryce Canyon National Park is all about natural amphitheaters or bowls filled with other-worldly rock spires known as hoodoos. These hoodoos amidst shifting sunlight reveal the most unbelievably brilliant oranges, yellows, and reds.
And then there is Zion National Park with some of the most terrifying and amusing hiking opportunities known to man.
These are the Utah National Parks…the Utah Mighty 5. Oh My!
I spent an extended time touring the parks and am excited to share with you a 7-Day Utah National Parks Road Trip Itinerary.
Table of Contents
Where to Begin. Salt Lake City or Las Vegas?
Salt Lake City and Las Vegas airports are the preferred beginning and ending points for a Utah National Parks road trip. Point to point trips or round trips are both doable and require little adjustment to my itinerary.
Note: If you plan to rent a car, compare prices and book in advance to ensure availability.
Pro Tip: Exploring five national parks in one week requires a lot of walking and hiking. Changing between three styles of footwear (hiking shoes, running shoes, and flip flops) kept my feet happy and ready for the next adventure. My regular rotation of footwear and socks includes Ahnu hiking shoes with Darn Tough ankle socks for hiking, Asics running shoes with Smart Wool running socks for walking, paved trails, and workouts, and Sanuk Yoga Mat flip flops for everything in between.
Day One: Travel Day
I had been touring Northern Utah so I chose to begin my Utah National Parks road trip from the Salt Lake City area.
The drive from Salt Lake City to Arches National Park in Moab, Utah takes about 4 hours.
Moab is a great little town with plenty of lodging, restaurants, a great outfitters shop, expedition guides, and 4×4 rentals. A 10-minute drive from Arches National Park and a 30-minute drive from Canyonlands National Park makes Moab the perfect basecamp.
Where to Stay in Moab, Utah
Moab offers accommodations to suit a range of needs and budgets.
Hampton Inn – Moab, Utah
A great choice for affordability. Offerings include consistently clean rooms, free continental breakfast, and in-room microwaves and refrigerators. Note: Hampton Inns are part of the Hilton Honors Rewards program. The membership rewards and consistency of cleanliness are the primary reason I chose to stay here.
Red Cliffs Lodge – Moab, Utah
On the grounds of a working ranch and featuring a horse corral, a museum, and a winery. Located ON the Colorado River and surrounded by red cliffs, even if you do not stay here, at the least, take time to walk the area to enjoy the amazing scenery, western film museum, and winery. Lodging here is a bit expensive but every room has a view to die for.
Camping
See the area parks’ websites for camping inside the parks. Arches National Park, Canyonlands National Park, and Dead Horse State Park have a range of options from primitive campsites to Yurts. Some free public land camping is available as well.
Day Two: Arches National Park
Arches National Park lives up to its name. Especially if you plan to spend only one day in the park, I recommend driving 18 miles from the Visitor Center entrance to the north end of the park to begin the day at Devil’s Garden.
Along the 18-mile stretch of road leading to Devil’s Garden, you will be awed by the preview of gigantic rock formations including Courthouse Towers and Balanced Rock.
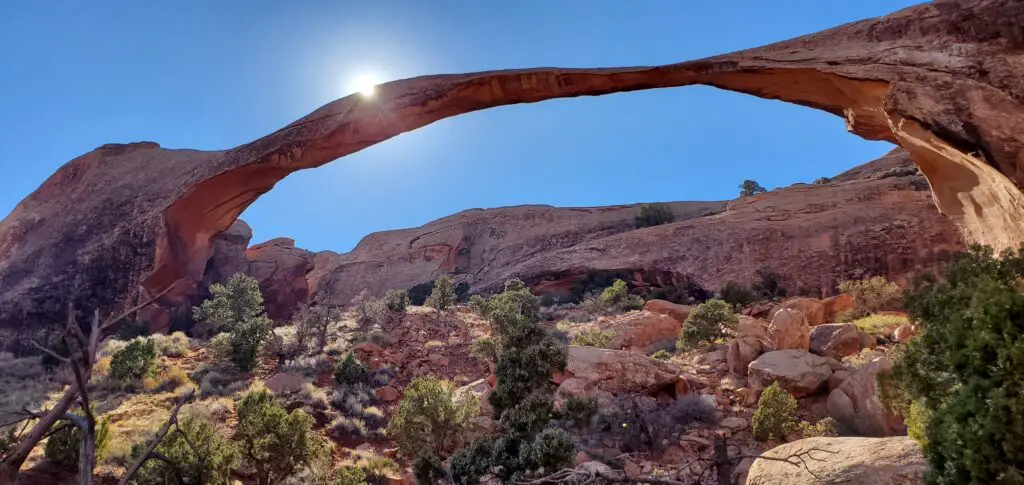
Landscape Arch
Landscape Arch, THE largest natural arch known to man, is located an easy .8 miles from the Devil’s Garden Trailhead.
For those extending time in the park, continue along the trail to about the 2-mile mark to find Double O Arch. Continue further to complete the entire 7.2-mile Devil’s Garden Trail along the Primitive Loop Trail to view additional impressive arches and formations.
Drive 3.5 miles south following signs to parking spaces near Fiery Furnace Viewpoint.
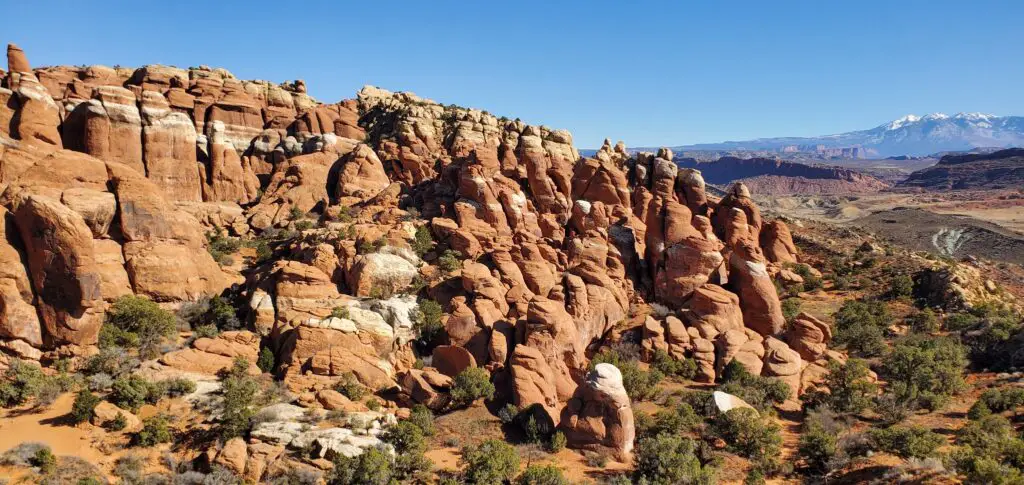
Fiery Furnace Viewpoint
Fiery Furnace, named for their red hue at sunset, is a network of narrow shady canyons among towering sandstone fins and spires. The trail can be viewed from above. Taking the trail requires a permit.
Drive 4 miles south following signs to the Delicate Arch parking lot. Park here if hiking up to Delicate Arch.
Along the drive to Delicate Arch, consider following the sign to Salt Valley Overlook for sweeping views of Salt Valley and the Windows Section.
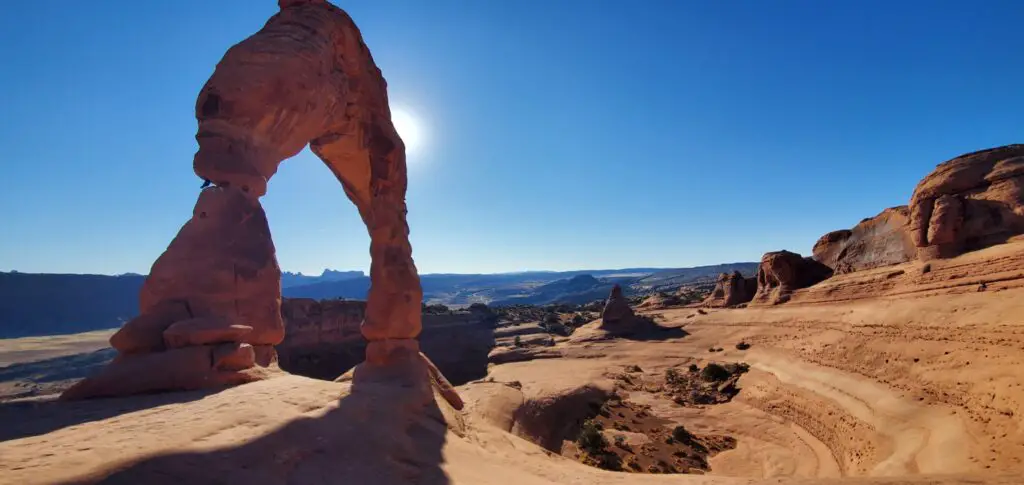
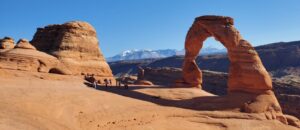
Delicate Arch
Delicate Arch is a 3-mile round-trip hike.
Not far from the trailhead entrance are short loops leading past the Wolfe Ranch cabin and Ute Indian petroglyphs. It is worth taking a few minutes to view both sites before heading across the bridge toward Delicate Arch.
The trail leads to gravel switchbacks, up red-rock pathways, and stone steps to a steep slickrock slope. At the top of the slope, enjoy the expansive view before locating small signs directing the way along rock and an open desert-like area.
And finally, around narrow ledges along a cliff.
Suddenly Delicate Arch comes into view. The feeling of reaching the arch is indescribable. Plan to hang out here for a while.
Note: The rock slopes around Delicate Arch are slick with sand and can be a bit precarious to navigate. Wear shoes with good traction.
The round-trip hike took me about 2.5 hours. Of all the more time-consuming hikes and sites, Delicate Arch was my favorite thing to do in Arches National Park.
Pro Tip: Late afternoon views at Delicate Arch are magnificent. Consider exploring other parts of the park and returning to begin the hike here at around 2 pm. Early morning is a great option as well.
Note: To get a distant view of Delicate Arch instead of taking the strenuous hike, drive 1 mile past the Delicate Arch parking lot to the Lower/Upper Delicate Arch Viewpoint parking lot. From here, take the 5-minute walk to the Lower Delicate Arch Viewpoint, or take the .75-mile hike to the Upper Delicate Arch Viewpoint.
From Delicate Arch, drive about 5.5 miles south following signs to the Windows Section. Along the way, consider following the sign to Panorama Point loop for spectacular views, or take a rest-break at one of the covered picnic tables here. This improved area of the park has become a preferred location for outdoor night sky viewing. See the park website for park ranger-organized viewing events.
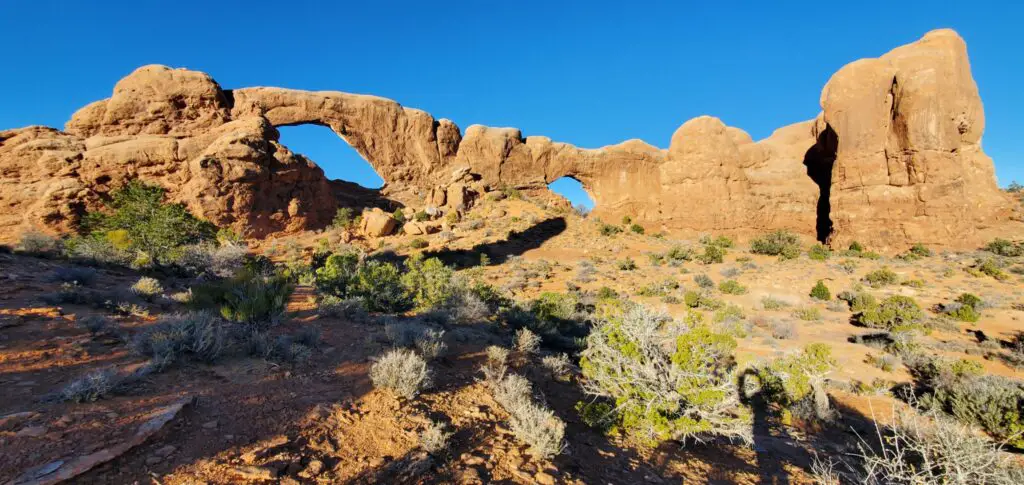
North Window, South Window, and Turret Arch
Park in the Windows Section parking area and take the easy 1.2-mile trail loop to view North and South Windows on the left and Turret Arch to the right.
Pro Tip: I was in this area in the early morning and chose to take the additional 1-mile Primitive Trail to the backside of North and South Windows for a sun-illuminated view of these amazing rock formations. The Primitive Trail is marked by cairns (man-made rock piles) and includes some rock scrambling.
Of all the EASY hikes the Windows Section was my favorite thing to do in Arches National Park.
Walk the .5-mile path across the parking lot and rest area to Double Arch, or drive a short way around the loop to park closer to the Double Arch walking path.
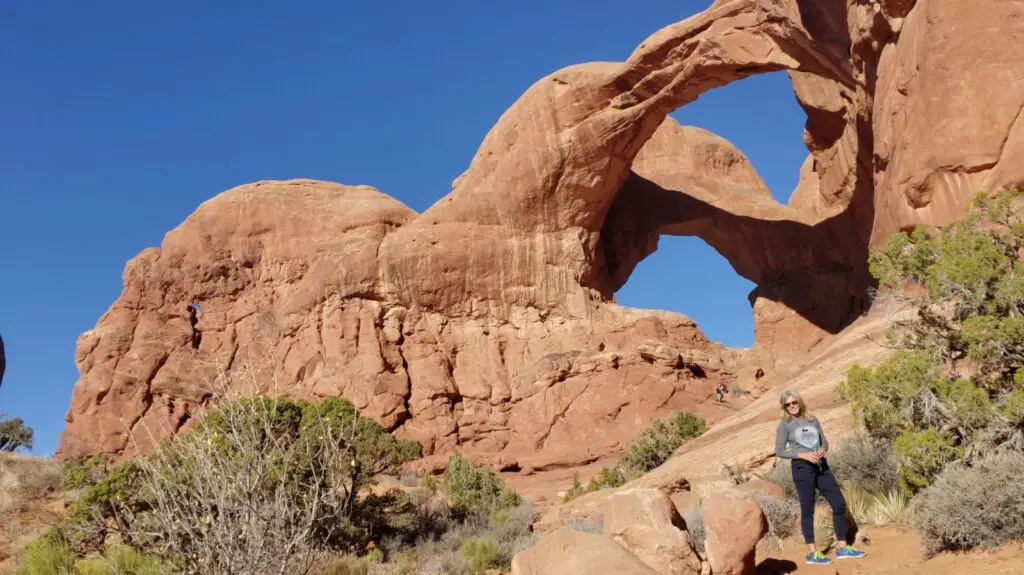
Double Arch
Do not miss walking the .25-mile pathway to Double Arch. The entirety of both arches cannot be seen from the road or parking lot. You do not want to miss the greatness of this pothole rock formation.
Drive 2.5 miles to the Balanced Rock parking lot. Parking here is limited.

Balanced Rock
Balanced Rock is such an interesting formation, a massive rock resting on a narrow pillar. Walk the .3-mile path around the rock’s base for a close-up look.
Drive 7 miles south to the roadside Park Avenue parking area. Along the way notice the mounds of time-hardened (petrified) sand dunes. Take a moment to stop at one of the road-side pull-outs to appreciate these dunes.
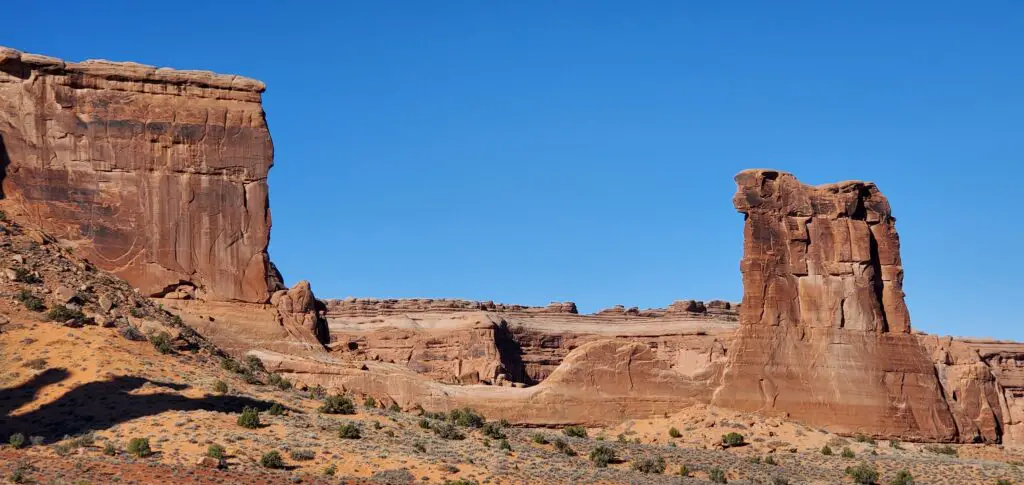
Park Avenue
I loved Park Avenue. Kids will love it too. The Park Avenue area is named for a collection of skyscraper-sized stone columns known as The Courthouse Towers.
Similar to spotting animal shapes in the clouds, watch for shapes in these gigantic Park Avenue rock formations. While driving, watch for Queen Nefertiti, Three Gossips, The Organ, Tower of Babel, and Sheep Rock. Take the easy 1.8-mile out and back Park Avenue Trail to view these beauties from the canyon floor.
Spend the evening resting up, or enjoy exploring the town of Moab. In the morning, take the 30-minute drive to Canyonlands National Park.
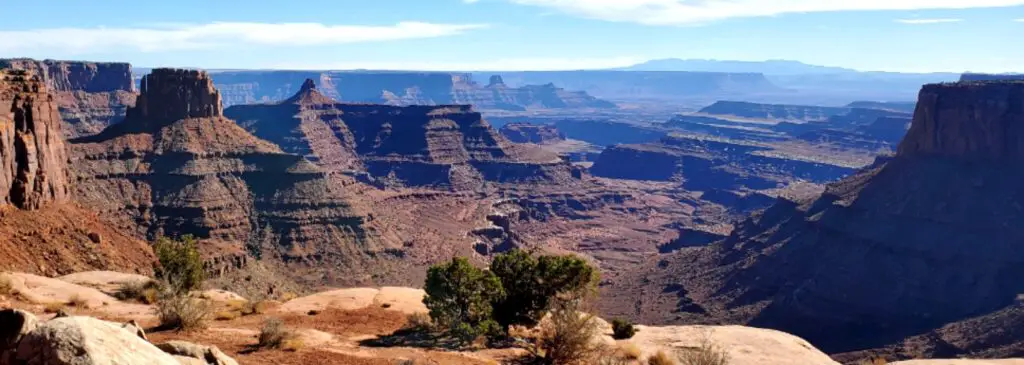
Day Three: Canyonlands National Park
Canyonlands National Park is the largest of the Utah National Parks and is divided into four districts. Island in the Sky, The Maze, The Needles, and The Rivers.
Much of Canyonland’s rugged terrain, boulders, arches, mesas, and massive canyons can be seen by car. Though many areas are accessible only by 4×4.
I chose to take a 4×4 small-group tour. It was fantastic!
Guided Tour of Canyonlands
After researching and reviewing several companies offering tours of Canyonlands I chose NAVTEC Expeditions.
NAVTEC is an established company offering tour guides with extensive knowledge of the terrain, geology, and history of the area. NAVTEC is known for vehicle safety as well.
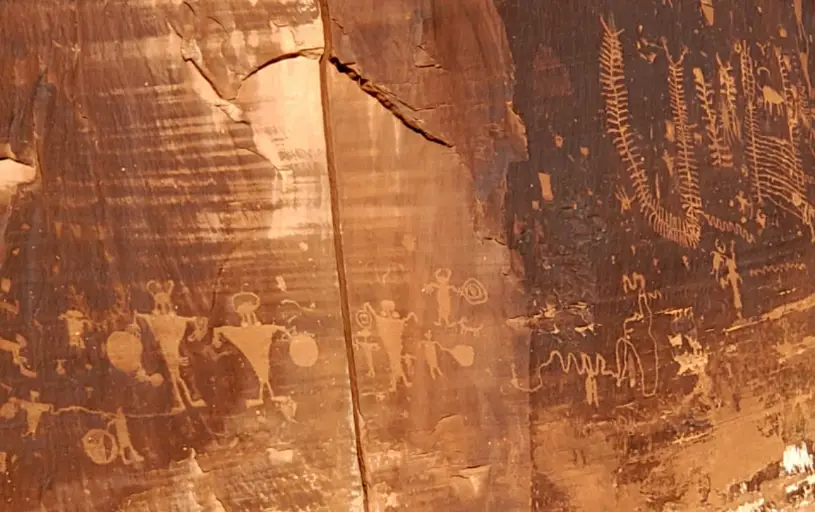
Petroglyphs and Pictographs
The day began with NAVTEC driver/tour guide, John, picking me up at my hotel in a 4×4 Landcruiser.
We drove along the Colorado River making brief stops to view Native American petroglyphs and pictographs estimated by Archeologists to date back to between 6,000 B.C and 1,300 A.D.
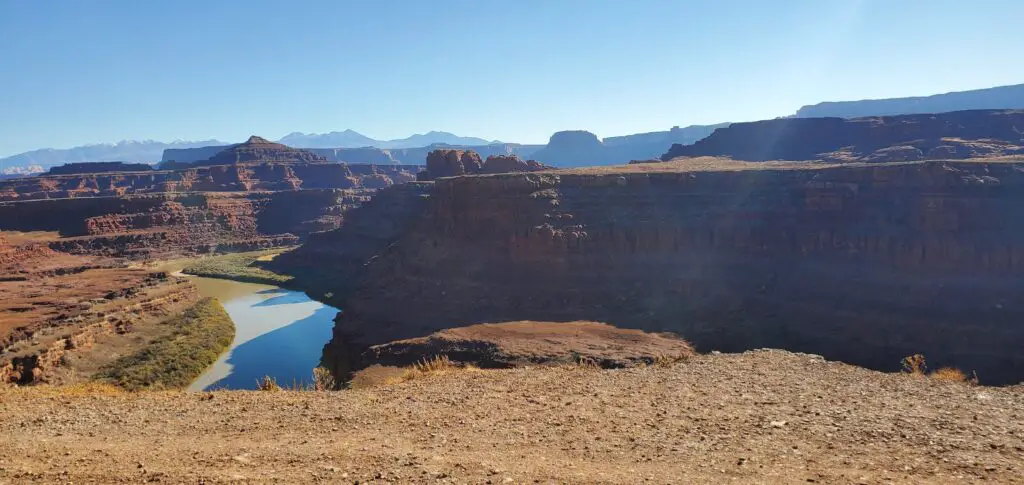
Thelma and Louise Point
The tour continued past potash evaporation reservoirs to Thelma and Louise Point, the iconic closing scene of the movie of the same name, and views of Dead Horse Point.
White Rim Road
Turning onto White Rim Road led to the impressive Colorado River Overlook, Gooseneck of the Colorado, and Musselman Arch.
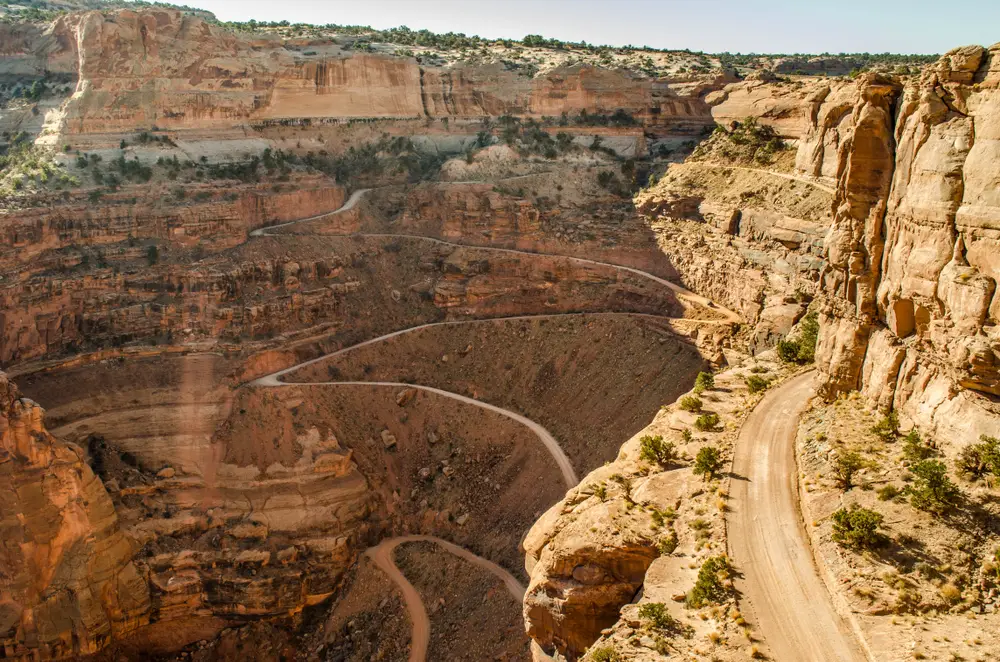
Shafer Trail
Backtracking past the Gooseneck of the Colorado, the tour continued along White Rim Road, then to Shafer Trail and along a series of narrow switchbacks up to The Island in The Sky Road and Visitor Center area.
We then enjoyed a fabulous lunch prepared by John at a wonder-inducing lookout point before continuing our tour.
Willow Springs Dinosaur Track Site
After lunch, we made a quick stop at the Willow Springs Dinosaur Track Site where we viewed a series of what archaeologists believe to be footprints made by a prehistoric three-toed dinosaur.
Drive-By Preview of Arches National Park
Not far from the dinosaur site, we made it to the original entrance to Arches National Park. It was so interesting to enter the park from this more remote and lesser-known entrance.
From here we took a quick drive-by tour of the Windows Section, Delicate Arch Lower Viewpoint, and Courthouse Towers where John pointed out a few of the must-sees of the park.
Throughout the tour, John gave big picture information related to the area’s geological and early pioneer history.
The tour came to an end after a beautiful drive back to Moab along that Colorado River.
My favorite thing to do in Canyonlands was being amused and terrified, taking in the numerous iconic rock formations and canyons, and spotting big-horn sheep. All this…at the same time…riding in a comfortable Landcruiser…driven by a capable and knowledgeable guide.
Note: Additional noteworthy overlooks and trailheads along The Island in the Sky Road include Shafer Canyon Overlook, Shafer Trail Viewpoint, Mesa Arch Trail, Buck Canyon Overlook, White Rim Overlook, and Grandview Point Overlook.
If time allows, visit Dead Horse Point State Park. The park is located between Canyonlands and Moab, a 20-minute drive back toward Moab from Canyonlands. Check out the Yurts and camping options here as well. At the least, drive to Dead Horse Point Overlook. The view from the “heavens” looking out over the Colorado River makes for a mesmerizing experience.
Drive 3 hours from Moab to Capitol Reef National Park in Torrey, Utah
Pro Tip: Be sure to take the UT-24 Scenic Drive route from Moab to Capitol Reef. If time allows, take the short detour to visit Goblin Valley State Park to view unique sandstone “goblins.”
Also, be prepared to stop at the UT-24 roadside pull-out at milemarker 123. Peek through the 6 tubes to view named mountains and rock formations.
Where to stay near Capitol Reef National Park
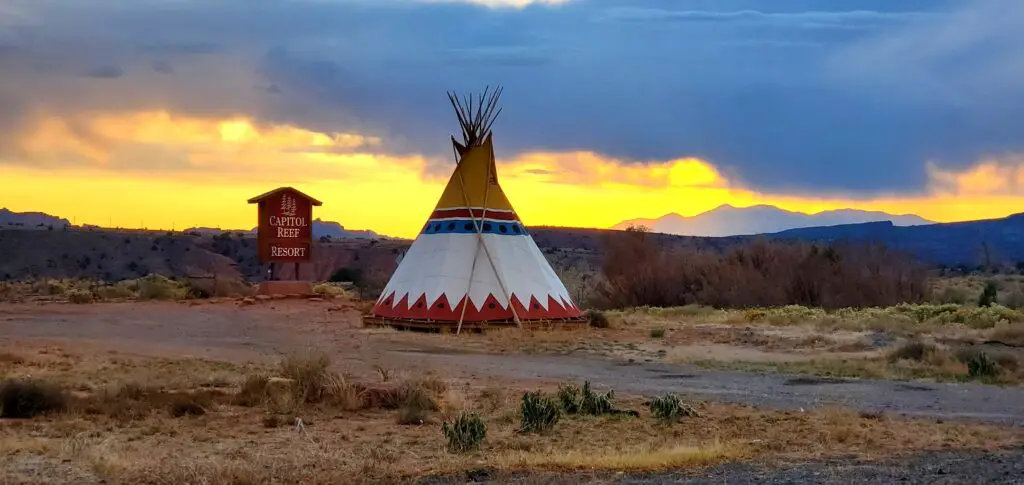
Capitol Reef Resort – Torrey, Utah
Quaint and unique. It is located near the West entrance of the park and offers comfortable guestrooms, upscale cabins, as well as glamping-style teepees and wagons.
Red Sands Hotel – Torrey, Utah
Close to the park and offering lovely views.
Camping
See the park website for camping inside the park. Sites are released on a 6-month rolling basis.
Day Four: Capitol Reef National Park
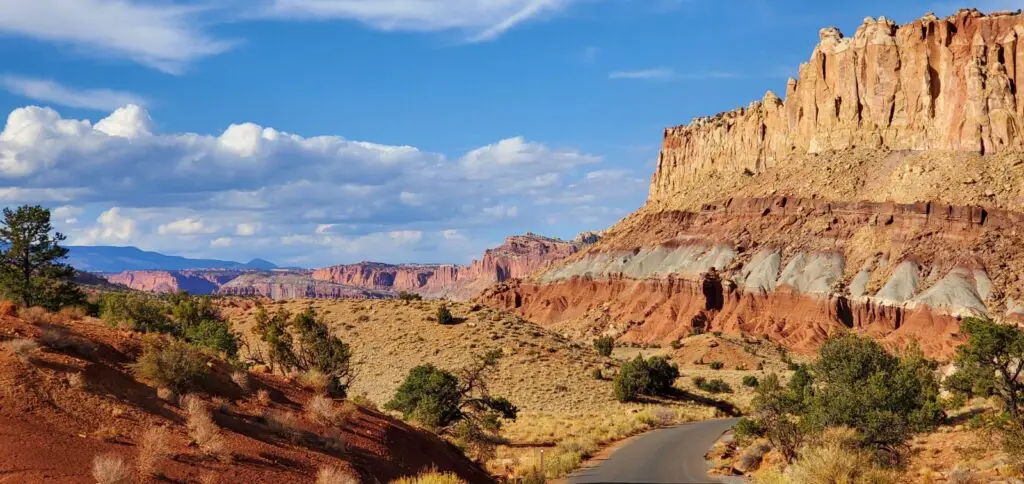
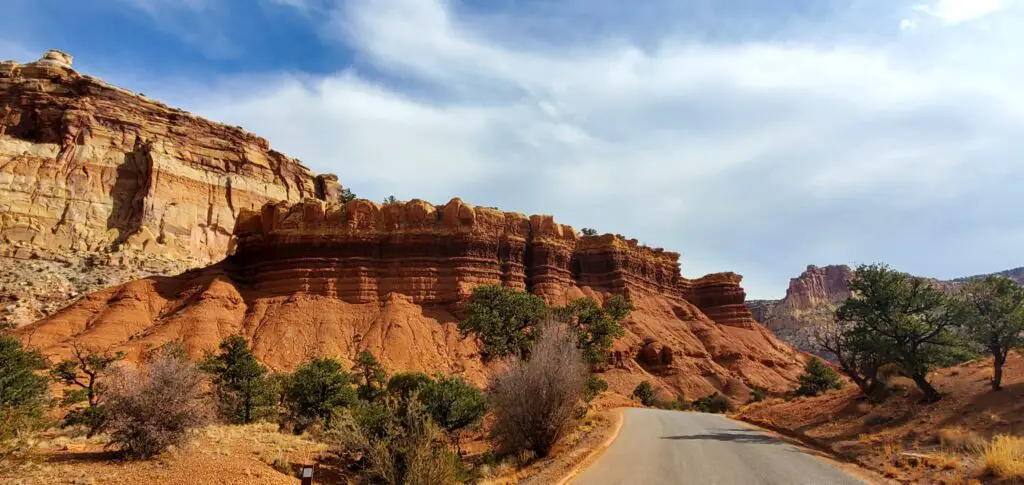
Capitol Reef is an amazingly colorful park of reds, oranges, and greens amidst white sandstone domes.
It is considered a drivable park with UT-24 leading to and through the park. No entrance fee, simply an orientation panel outlining the rules and best practices in the park. There are several great hikes as well.
Capitol Reef Sites along UT-24
UT-24 runs through the sweet little community of Fruita. Settled in the early 1880s, watch for the following sites that have been preserved along this historic district:
Behunin Cabin
A tiny homesite of one of the early pioneer families.
Capitol Dome
A massive sandstone dome and namesake of the park.
Petroglyphs
A short boardwalk leads to prehistoric Indian art.
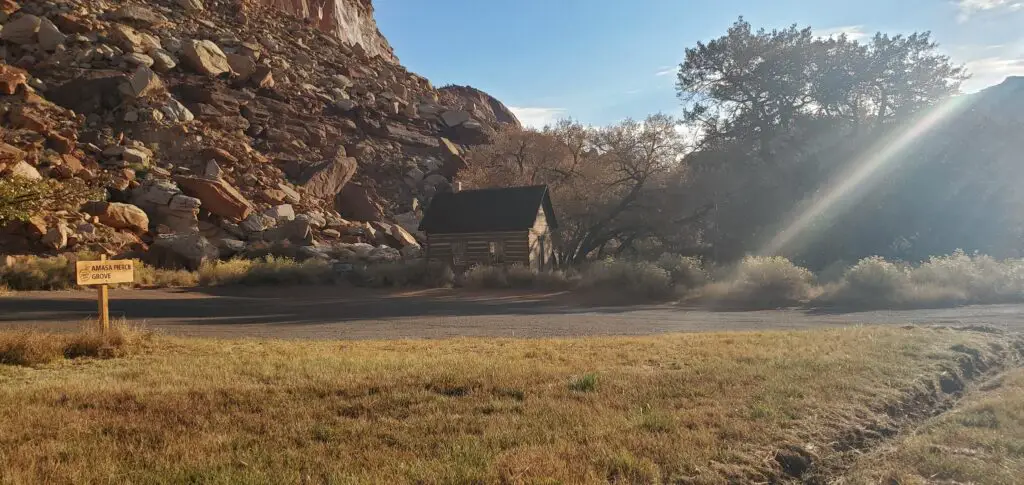
Fruita Schoolhouse
This building served not only as a schoolhouse for the few children who lived in Fruita but as a community center and churchhouse.
Historic Orchards
2,500 fruit trees are maintained by the park service to preserve the historic landscape. Visitors are allowed to roam among the orchards and even pick and eat the fruit.
Capitol Reef Hikes along UT-24
Panorama Point
Located near the West entrance of the park and more of a short walk than a hike at about 100-yards. The view offers a nice preview of what the park has to offer.
Chimney Rock Loop
Located near the West entrance of the park. This 3.6-mile strenuous loop with 590 ft. elevation gain offers panoramas of Waterpocket Fold cliffs. The Chimney Rock formation can be spotted from the road.
Goosenecks Overlook
Children will enjoy climbing this little .1-mile hike through tight kid-sized switchbacks to the top with views of the winding Sulfur Creek below.
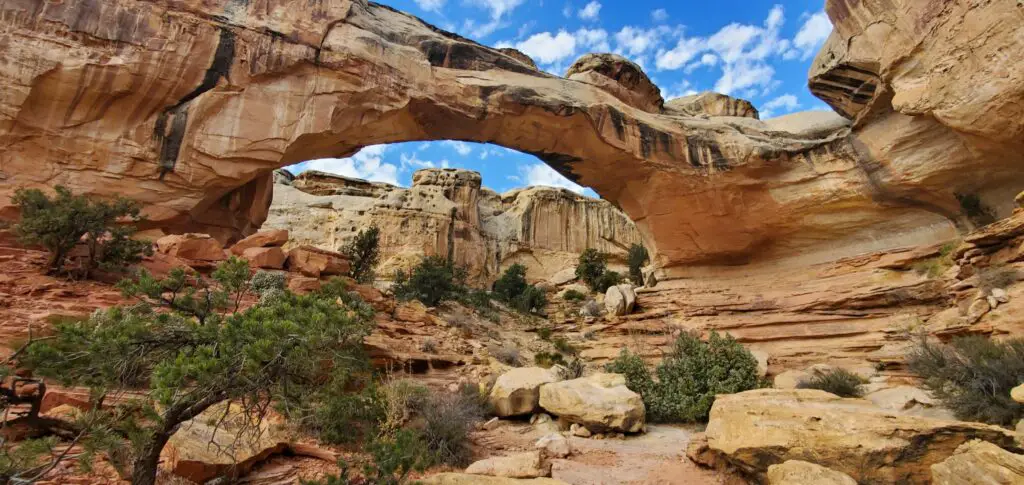
Hickman Bridge
One of my favorite things to do in Capitol Reef National Park was the hike to Hickman Bridge. This 2.2-mile hike has it all.
Be sure to pick up a .50 cent interpretive pamphlet and map at the trailhead self-serve station. The hike takes you past the flowing Fremont River, up to views of Capitol Dome, a prehistoric Native American site, down to and through a sandy wash and small natural bridge formations.
And finally, slight scrambling up to and around the gigantic natural Hickman Bridge.
Capitol Reef Scenic Drive (Side Roads and Hikes)
After enjoying the hikes and sites along UT-24, turn south off of UT-24 at the Visitor Center. Proceed a short way passing unique black volcanic boulders, historic sites, a horse corral, and campgrounds to reach the 21-mile out and back Capitol Reef Scenic Drive.
Capitol Reef Scenic Drive offers a more back-country feel with massive colorful rock formations, rugged side roads, and access to trails.
Note: There is a self-serve fee station located at the entrance to Capitol Reef Scenic Drive.
Grand Wash Road
Drive the rough 2.6-mile out and back road along the wash. This is an area where water floods and drains leaving unique slot canyon-type formations. I loved this drive.
If time allows, take the Cassidy Arch hike. The trailhead is located at the end of Grand Wash Road.
Due to flash flooding in this area, do not enter during inclement weather.
As a side note, signs of the 1950’s “uranium boom” are evident in the Grand Wash area.

Capitol Gorge Road
A 2.4-mile rugged road leading to Capitol Gorge Trailhead. Even if you do not take the Capitol Gorge hike, it is still worth taking the drive.
Note: High clearance vehicles recommended.
Capitol Gorge Trail
The Capitol Gorge Trailhead is located at the end of the rugged 2.4-mile Capitol Gorge Road. It is a 2-mile out and back hike passing through towering cliffs with petroglyphs and names of pioneers (pioneer registry) carved into the cliffs.
Follow the trail-side sign up to The Tanks for a bit of scrambling up to large hollowed out rows of natural bowl-type reservoirs high above the canyon floor.
Of all the hikes in the area, Capitol Gorge Trail to The Tanks was one of my favorite things to do in Capitol Reef National Park.
Drive 2 hours from Capitol Reef to Bryce Canyon City, Utah.
I loved this drive. The scenery turns a little less mountainous and more Montana ranchland-like with a surprise of large herds of fluffy white sheep dotting the fields before returning to the expected cliffs upon approach to Bryce Canyon.
Where to stay in Bryce Canyon
There are two Best Westerns in Bryce Canyon. Best Western Plus Ruby’s Inn and Best Western Plus Bryce Canyon Grand Hotel.
Best Western Plus Ruby’s Inn
A staple of Bryce Canyon. It has been around for a while, has an affordable buffet-style restaurant, and is adjacent to Ruby’s Inn RV Park and Campground. Ruby’s is a bit of a destination in itself.
Best Western Plus Bryce Canyon Grand Hotel
This is the newer of the two Bryce Canyon Best Westerns and is more affordable. I chose to stay here and will plan to stay again. I loved the decor of the large entry area with its large fireplace and comfortable lodge-style furniture as well as the beautiful pool area.
The Lodge at Bryce Canyon
Located inside the park. Offerings here include the lodge, hotel rooms, and cabins.
Camping
The North Campground offers 99 sites on a first-come, first-serve basis. Sunset Campground has 100 primitive sites available for reservation on a 6-month rolling basis.
Day Five: Bryce Canyon National Park
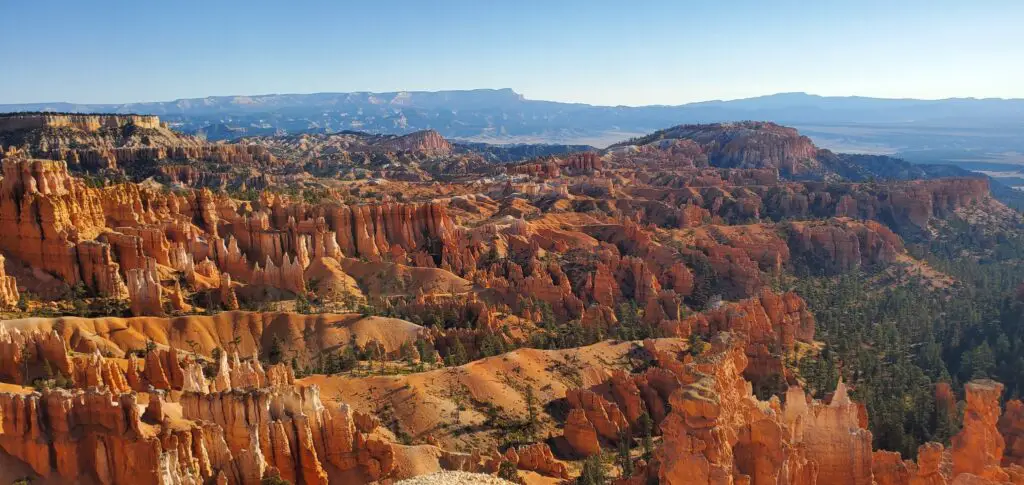
Bryce Canyon National Park. Wow. I cannot express how much I enjoyed this park. Though hoodoo rock formations are found all over the world, the concentration here is bewildering.
If spending only one day in Bryce Canyon it is a good idea to focus on exploring the incredible hiking areas between Sunset Point and Sunrise Point.
Sunset Point Trail
I got a bit of a late start and reached the Sunset Point parking lot at around 9 am. Yes, I recommend beginning in the morning at SunSET Point and ending at SunRISE Point.
Not far from the beginning of the Sunset Point walking path is an expansive amphitheater view. In the morning sunlight, it is visually shocking.
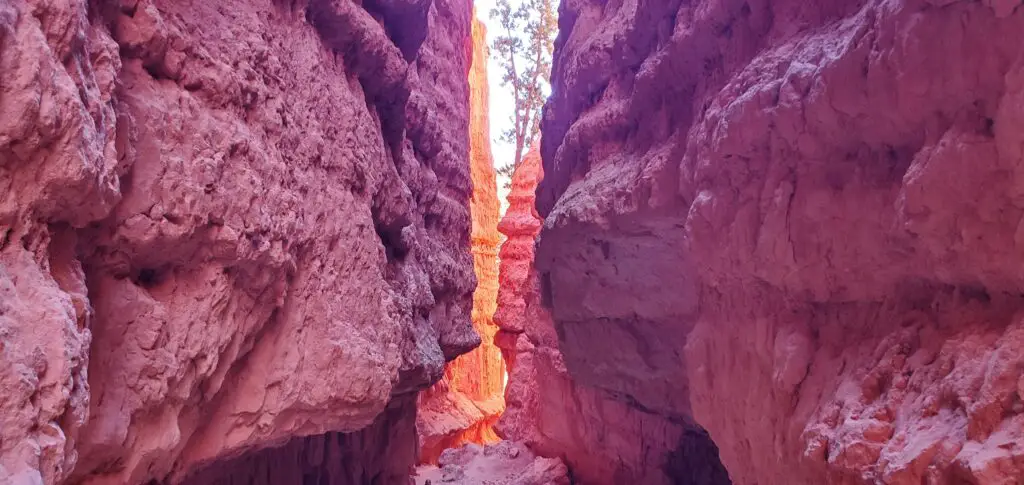
Navajo Loop Trail to Wall Street
Follow the Navajo Loop trail and watch for a sign pointing toward Wall Street. Descend along switchbacks into the lower elevation area where the morning sun streams down through close and colorful hoodoo spires. It takes about 20 minutes to get to and through the Wall Street section. This side-hike is so worth the effort.
Queens Garden Trail
Continue following Navajo Loop through a forested canyon area. The presence of evergreens growing among hoodoos is indescribable.
Continue following the Navajo Loop to the signed intersection of Navajo Loop/Sunset Point to the left and Queens Garden/Sunrise Point to the right. Follow the sign to the left toward Queens Garden.
Note: I chose to take the Navajo Loop to the right uphill for about 5-10 minutes to view Two Bridges, a small corridor with two small natural bridges. I then backtracked down to the intersection to follow the sign toward Queens Garden/Sunset Point Trail.
It takes about 30 minutes of slight elevation change to get out of the valley and to a small archway where Queen’s Garden/Sunset Point Trail begins.
Queens Garden begins by passing through this small archway. The trail leads through incredible hoodoos and expansive amphitheaters.
Note: Before passing through the small archway to Queens Garden, I took the very short path to the left to view the Queen Victoria rock formation.
Queens Garden Trail leads to Sunrise Point Trail.
Sunrise Point Trail
Sunrise Point Trail has a slight elevation gain along switchbacks and offers viewing plateaus.
The hike ends at the Sunrise Point lookout and parking lot area.
Follow the sidewalk for about .5-miles to the Sunset Point parking lot where the hike began.
The entire Sunset Point loop hike took me about 2 hours at a comfortable pace.
Pro Tip: Beginning at Sunset Point allows for descending to the Wall Street section at the beginning of the hike rather than leaving this steep section to the end.
Additional viewpoints with fairly easy access from the central section of Bryce Canyon Amphitheater include Fairyland Point, Inspiration Point, and Bryce Point.
Other noteworthy viewpoints include Rainbow Point and Yovimpa Point.
Note: At 8,000 feet, Bryce Cayon National Park often is a bit cooler than the other Utah Mighty 5 National Parks.
My favorite thing to do in Bryce Canyon National Park was the Wall Street section of Navajo Loop Trail. I have never seen such vibrant colors of orange, yellow, and red as the mid-morning sun streamed down through this enchanting slot canyon area.
Drive 2 hours to Zion National Park in Springdale, Utah
It was a welcomed short and easy drive from Bryce Canyon to the Zion National Park area. I enjoyed getting settled in and resting a bit before beginning my time exploring Zion.
Where to stay near Zion National Park
Cable Mountain Lodge – Springdale, Utah
Located practically on the grounds of the Zion National Park Visitor Center. I loved everything about my stay at this hotel. A little pricey but well worth it for the location.
Econo Lodge – Hurricane, Utah
Offering simple but clean rooms, free breakfast, a pool, and crazy affordable. Hurricane is about a 30-minute drive from the park so accommodations here are less expensive than those in Springdale. Also, Hurricane has an abundance of hotels, restaurants, and access to groceries and supplies making it a preferred location for many park visitors.
Best Western Plus Zion West – La Verkin, Utah
Located about 20-minutes from the park. There are not a lot of restaurants in La Verkin but Hurricane and access to plenty of restaurants are only 3 miles away. I chose to stay here for a few nights. It was quite comfortable.
Day Six: Zion National Park
Zion National Park is Utah’s first National Park and most well-known. Two world-renown hikes are located here. Angel’s Landing and The Narrows.
It would be hard to explore much of Zion in a single day, so my itinerary allows for 2 days. 3 days would be even better.
The park has two major canyons. Zion Canyon and Kolob Canyon.
Zion Canyon is the most visited canyon.
Within Zion Canyon are two roads leading to scenic views and hikes:
1. Zion Canyon Scenic Drive is accessible only by shuttle or by walking or biking in from the nearby town of Springfield. The most popular hikes in the park are accessed from this Zion Canyon Scenic Drive.
Pro Tip: Those lodging at Zion Lodge are the only visitors allowed to drive personal vehicles along Zion Canyon Scenic Drive.
2. Zion-Mount Carmel Highway is accessible by personal vehicle. There is no shuttle service along Zion-Mount Carmel Highway.
Shuttle Tickets
In early November 2020, the Zion Shuttle system was running with limited capacity. Shuttle tickets had to be purchased ONLINE ONLY at recreation.gov for a cost of $1.
Tickets were made available in two ways:
1. Purchase TWO WEEKS in advance at recreation.gov, or
2. A LIMITED NUMBER of tickets were made available at 9 am each morning for use the following day. I recommend being pre-registered at recreation.gov, signed into the app by 9 am, and ready to secure the preferred shuttle time.
For up-to-date shuttle information visit the park website.
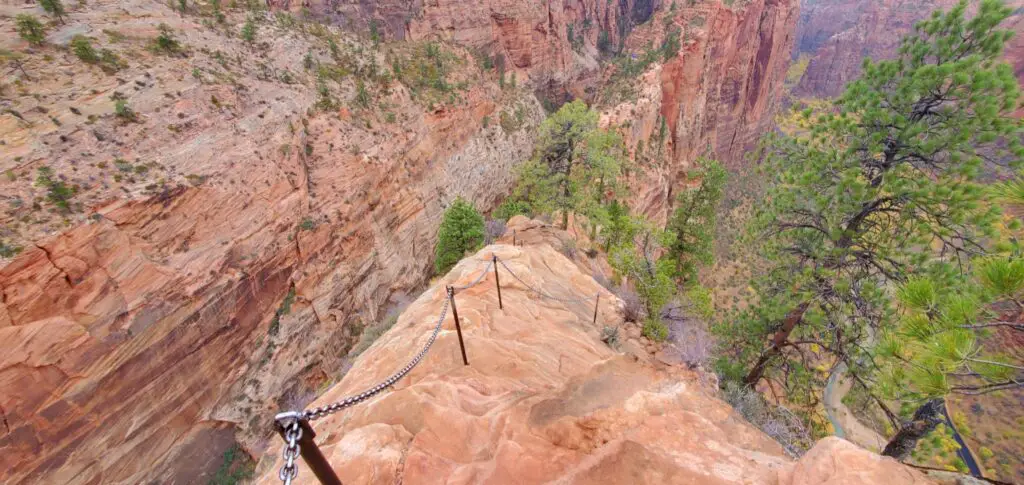
Angel’s Landing
Angel’s Landing is considered one of the most dangerous national park hikes in the world.
Is it really THAT dangerous? Yes, it can be.
Is it doable for novice hikers? Yes, definitely.
But Angel’s Landing is not recommended for those with balance issues or an extraordinary fear of heights.
The 2.5-mile hike begins at The Grotto Trailhead (Shuttle Stop 6). The trail follows the West Rim Trail for about 20 minutes with slight elevation gain to Walters Wiggle bridge. From here, elevation gain increases along switchbacks for another 20 minutes to Scout Lookout.
Scout Lookout is a destination-hike in itself offering great views and scurrying chipmunks looking to steal bits of fruit and nuts.
For those who feel up to it, begin the “chain section” of Angel’s Landing just past Scout Lookout. Here chains provide some support to help navigate the steep and narrow ridges with drop-offs on either side. Navigating 2-way traffic along ridges barely wide enough for 1 person takes patience and time. Especially during crowded peak seasons.
Making it to Angel’s Landing summit allows for indescribable views. The overwhelming feelings of accomplishment (and relief) are indescribable as well.
Note: During early November the crowds were light and I was able to complete the accent in 45 minutes and the descent in about the same amount of time. The full round-trip hike with a 20-minute snack break at Scout Landing took me about 3.5 hours.
There are many easy-moderate family-friendly hikes and sites in Zion Canyon. The favorites include:
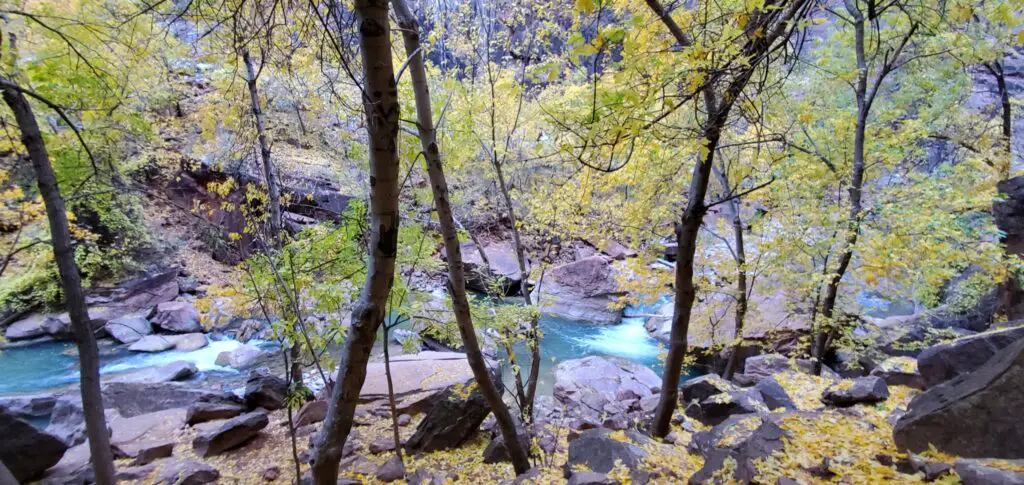
Riverside Walk
Following along the amazingly beautiful Virgin River, this easy hike is one of the most scenic and enjoyable in the park.
The trailhead is located at Temple of Sinawava (Shuttle Stop 9).
Note: The Riverside Walk ends at the Virgin River where The Narrows hike begins.
Emerald Pools Trail
I enjoyed the Lower Emerald Pool area most, though hiking to the Middle Emerald Pool and the Upper Emerald Pool are worth the mini-adventure.
Depending on the time of year, the waterfalls and pools may be more or less flowing and full.
The trailhead is located at Zion Lodge (Shuttle stop 5).
Zion-Mount Carmel Highway Drive and Canyon Overlook Trail
Zion-Mount Carmel Highway (SR-9) is a state route highway running through a section of the park and is open to traffic passing through the park.
Park shuttles do not run along Zion-Mount Carmel Highway.
This 25-mile section of highway takes about 1-2 hours to drive out and back depending on how many times you cannot resist stopping at a road-side pull-out to enjoy the views and hikes.
Be ready for traffic to be backed up at the historic 1920s tunnel area.
Immediately after exiting the tunnel, watch for the tiny parking area on the right (compact vehicle parking only) or find a road-side parking spot to take the Canyon Overlook hike.
The Canyon Overlook trail is a popular and fun 1-mile out and back hike leading to a viewpoint overlooking the lower Zion Canyon.
Continue driving along Zion-Mount Carmel Highway and watch for Checkerboard Mesa, a massive sandstone formation with patterned striations in the form of a checkerboard.
Continue along the scenic highway to the East Entrance of the Park. Exit the park here, or take a quick break then enjoy the views in reverse as you make the return trip.
Day Seven: Zion National Park and Travel Day
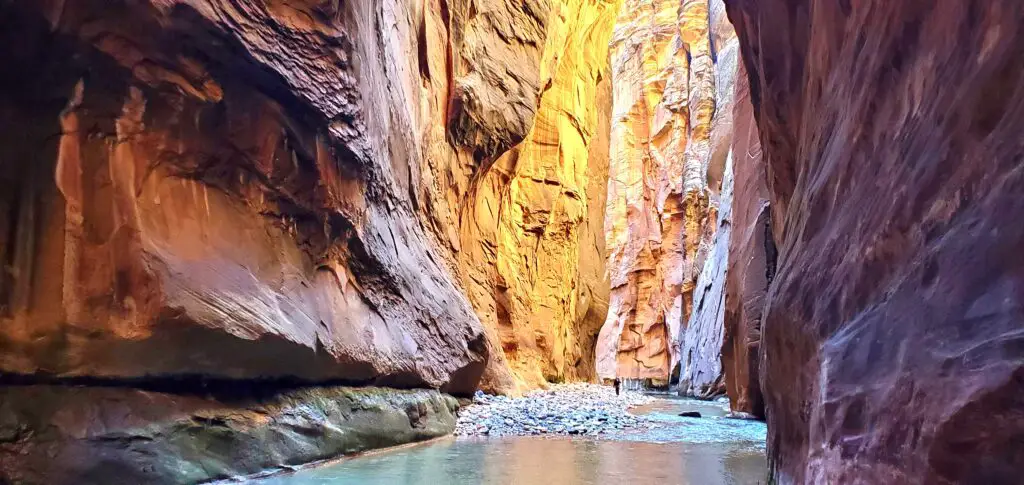
The Narrows
The Narrows is considered one of the most unique hikes in the world.
There are two ways to take The Narrows hike. Bottom-Up is a 9-mile out and back hike and is the most popular. Top-Down is a 16.5-mile out and back hike and requires a permit.
Flash Flood Warning
Check the weather and visit with area Park Rangers before hiking The Narrows. Flash floods present a huge danger. Water level fluctuates from year to year, month to month, and even day to day. It is not wise to proceed if water is flowing more than 50 cubic feet per second (CFS). The Narrows is closed when water flow reaches the 150 CFS mark.

Pro Tip: During cooler months, stop in at Zion Outfitter for gear to comfortably navigate through The Narrows. Basic rental packages include neoprene socks, water shoes, waders, and a walking stick.
The Narrows Bottom-Up
This 9-mile hike begins near the Temple of Sinawava (Shuttle Stop 9). Take the 2-mile Riverside Walk, aka The Gateway to the Narrows. At the end of the Riverside Walk is access to the Virgin River.
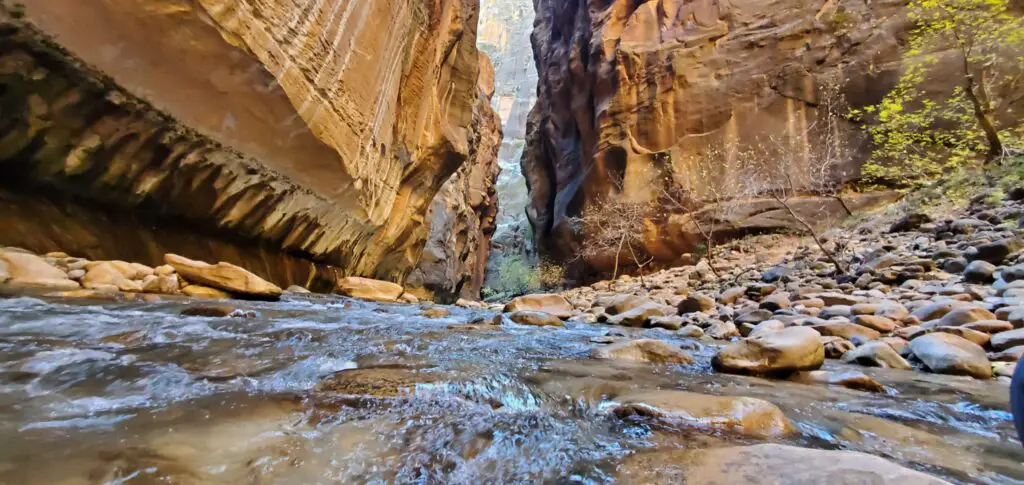
Simply begin wading up the Virgin River. The remainder of the Narrows is IN and along the banks of the flowing river amidst towering canyon walls.
At about the .5-mile mark watch for Mystery Falls where water rolls down the sandstone.
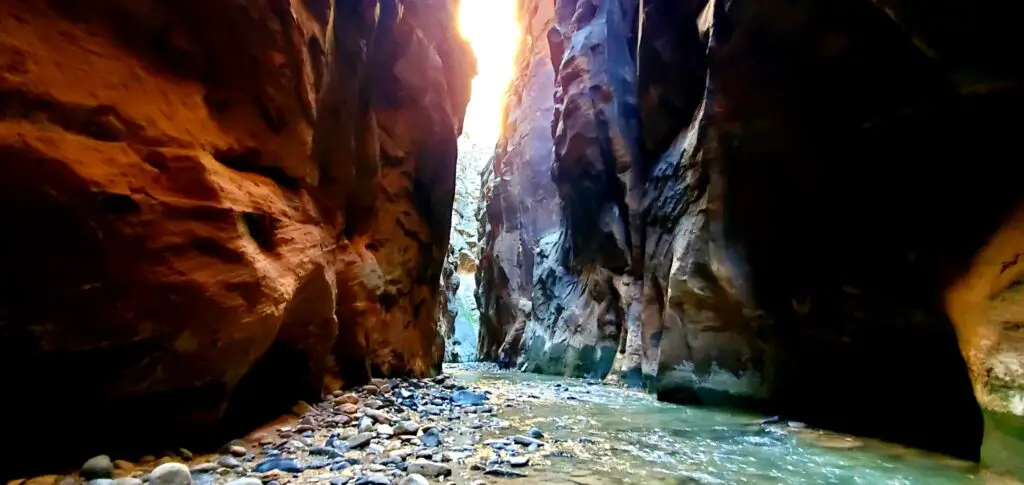
The iconic narrow Wall Street section, named for towering canyon walls, is at about the 2.5-mile mark.
Proceeding to Big Springs, the 4.5-mile mark and furthest point on the hike, will require swimming or wading through waste-high (or higher) water. A permit is required to proceed beyond this point.
From Big Springs, enjoy the hike back downstream. The views in reverse give the feeling of being on a brand new hike.
Travel from Zion National Park: Drive 2.5 hours to Las Vegas, or 5 hours back to Salt Lake City
I love both Las Vegas and Salt Lake City. If time allows, spend an extra day or two to explore these unique cities.
Optional 12-Day Utah National Parks Road Trip
For those traveling with children or wanting more time to explore and hike, consider a 12-Day road trip itinerary. Simply use my 7-Day Road Trip Itinerary and allow an extra day in each of the parks.
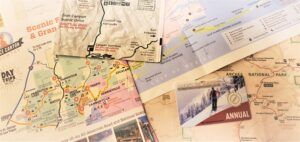
America the Beautiful: National Park Pass – $80
The American the Beautiful National Park Pass can be purchased at any of the parks. It is valid for one year for admission to any national park or federal recreation site including Arches, Canyonlands, Capitol Reef, Bryce, and Zion National Parks.
Getting Around the Parks
Rental Car or Personal Car
If you plan to rent a car, compare prices and book in advance to ensure availability.
The parks offer various transportation services. Options include shuttle service, guided tours, bike rentals, and 4×4 rentals. See each park website for information on the types of vehicles allowed.
Now, just a few things to remember
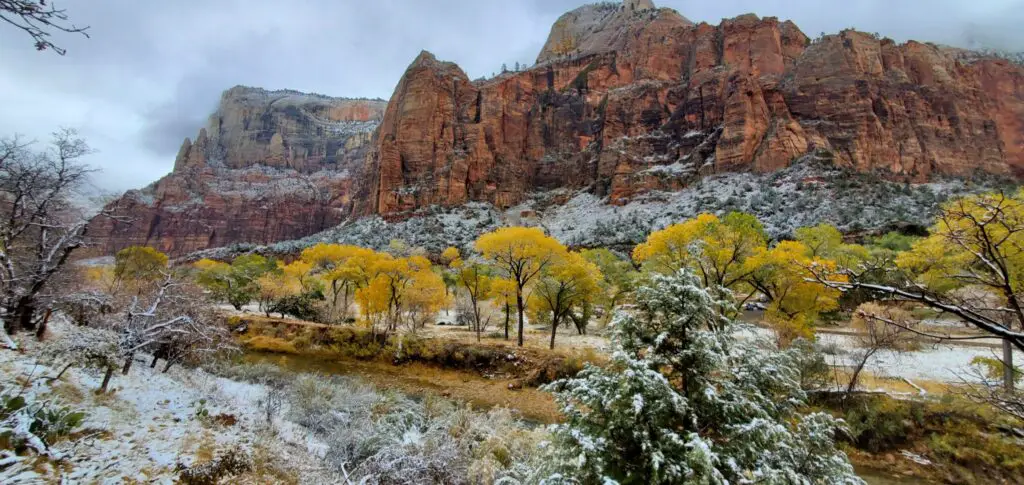
Check the weather before you go. During my November visit to the Utah Mighty 5, the weather at every park was incredible. Mostly lows in the 40s°F and highs in the 60s°F, though there were a few days with light rain and dusting of snow. Summer months can be incredibly hot, with May to September being the most comfortable.
See the Utah National Parks website for closures due to weather, season, fallen rocks, or maintenance.
Warning: Even during the cooler months, BRING PLENTY OF WATER! Water stations are available throughout the parks though may become inoperable due to overnight freezing temperatures.
Also, there is little or no cell service in the parks so grab a map or download trail information before entering the parks.
During my time in the parks, I got a lot of use out of my Ahnu hiking shoes. They are lightweight for everyday use which is helpful when I want to travel with only a few pairs of shoes. I could not have made it to Angel’s Landing summit without my Ahnu’s.
Travel insurance covers unexpected events such as re-booking flights due to airline cancellations, replacement of belongings when luggage is lost, replacement of stolen items, or emergency travel home due to accident or illness. I recommend World Nomads, an insurance provider trusted by seasoned travelers worldwide.
Also, check out my road trip packing list.
Be prepared and be safe out there!
Trust your senses.
Trust your gut.
If you’ve planned well and it feels right, do it!
If it doesn’t feel right, don’t.
I would love to hear about your experiences exploring the Utah National Parks!
Recommended Guided Tour of Canyonlands and Arches
4×4 Tour from Moab, Utah to Canyonlands and Arches National Parks
Top-Rated Guided Tours from Las Vegas
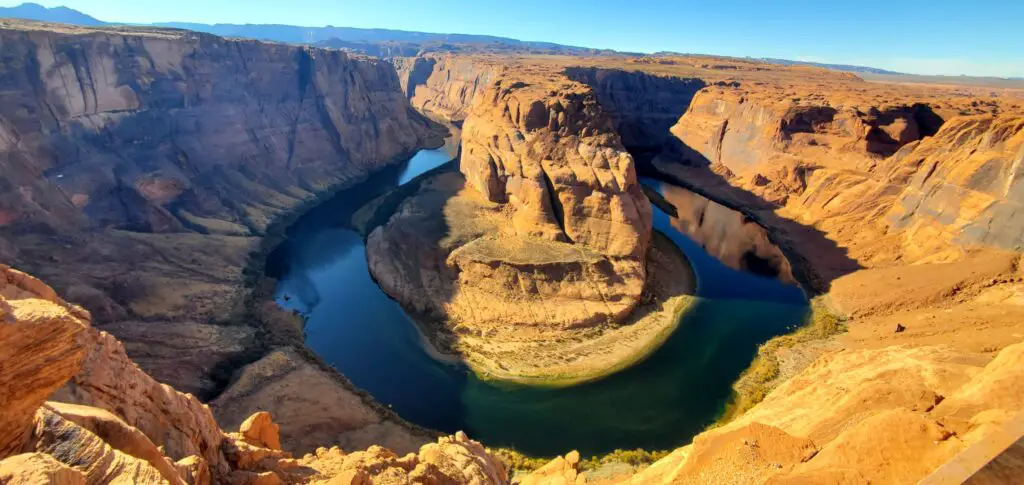
Las Vegas to Arizona’s Antelope Canyon State Park and Horseshoe Bend of the Colorado River Overlook
Las Vegas to Arizona’s Grand Canyon West
Additional Western United States Travel Guides
Glacier/Yellowstone/Grand Teton National Parks Road Trip Guide


18 thoughts on “Utah National Parks Road Trip: Utah Mighty 5”
What a brilliant guide to such gorgeous parks- love the nature photographs a lot. You really gave a sense of the beauty of these parks in this post. So wish I could travel right now!!!
Thank you! I loved these parks so much!
The Capitol Reef Scenic Drive sounds so amazing! Such a great guide. Thanks for sharing!
Thank you! I loved the colors along the Capitol Reef Scenic Drive!
What a lovely, comprehensive post! I love Utah’s parks!
Thank you! Utah is such a beautiful state!
Woooah what an epic post! It sort of is “just a bunch of parks full of a bunch of rocks.” Still, I would looove to visit, camp and hike to my hearts content!!
This post really does show the best spots of these stunning parks!
Thank you! The hiking is amazing! So many options!
There are some incredible rock formations here! I love that you’ve also included other activities to do in the area other than looking at the rocks too.
Yes, there is just so much to do and see in Utah!
Wow. Visiting Utah’s parks has been high on my bucket list for a long time. The landscape is so other worldly! I think Zion is the top of my list though. Thanks for sharing!
Thank you! I loved Zion so much!
Oh this is so helpful! I love all of the parks in Utah. I’m hoping to plan another road trip for the spring so i’ll definitely be referencing this.
Thank you! I hope to get back to explore more of Utah soon!
Great post!! I really love Utah! The national parks are just amazing and this is a fantastic guide to them.
Thank you! I loved my time in the parks!
Amazing! I know nothing about traveling all over the country, what a wonderful looking place to explore.
Thank you! It was truly an amazing road trip.